
Match Impact-Driver Bits to the Tool and Fastener
Match driver bits to an impact driver's 1/4-inch hex collet, screw recess and exact size. Compare power bits, insert holders and nut setters for safer driving.
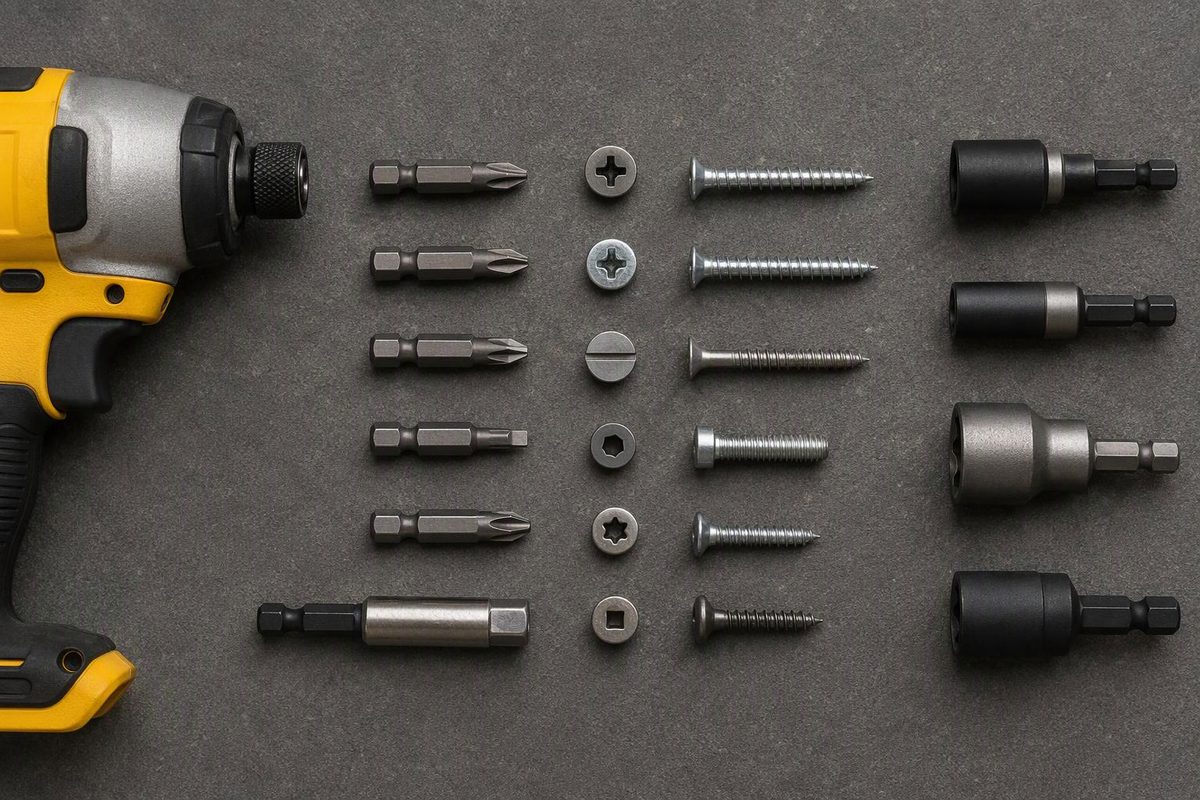
For an impact driver with a 1/4-inch hex collet, use an impact-rated 1/4-inch hex-shank accessory with a tip that matches the fastener’s exact drive and size. Confirm the interface in the tool manual because shank width alone does not establish that the accessory has the correct retention profile.
A direct-fit power bit normally goes straight into the collet. A short 1-inch (25 mm) insert bit normally needs an impact-rated holder. For an external hex-head screw, use an impact-rated nut setter in the exact across-flats size.
Choose the fastener interface and bit format; the result identifies the accessory to look for.
Impact-Driver Bit Matcher
Optional: add the specified size
Use an impact-rated 1/4-inch hex-shank power bit with the exact PH size specified for the screw.
- Tool side: 1/4-inch hex shank with the required retention profile.
- Fastener side: Phillips profile in the exact PH number.
- The power bit normally fits directly in the collet.
Source basis: manufacturer specifications and manuals cited in the article. The fastener package, drawing or supplied-bit marking controls the exact drive size.
Match All Four Specifications
| Match | Look for | Compatibility limit |
|---|---|---|
| Tool interface | 1/4-inch hex shank and suitable retention profile | Do not confuse shank dimension with tip size |
| Drive type | Phillips, Pozidriv, Torx/star, square, hex, slotted or another specified system | Similar-looking drives are not automatically interchangeable |
| Drive size | PH2, PZ2, T25, SQ2, 5/16 inch, etc. | Read the screw package, drawing or supplied-bit marking; screw diameter alone does not determine it |
| Impact rating | “Impact rated,” “impact ready” or explicit manufacturer approval | A bit that fits physically is not necessarily designed for repeated impact loading |
Bosch, for example, lists PH1, PH2 and PH3 bits with a 1/4-inch impact-rated hex shank. Its range includes 25 mm insert bits and 55 mm power bits, illustrating why tip size, shank and bit format must be checked separately (Bosch Professional).
Match the Tip to the Screw Recess
- Phillips: Match the PH number. A tip that rocks, bottoms poorly or grips only at its corners may be the wrong size or worn.
- Pozidriv: Match the PZ number. PH and PZ are different profiles; PB Swiss Tools notes that a Phillips tip has play in a Pozidriv recess, while a Pozidriv tip cannot properly enter a Phillips recess (PB Swiss Tools).
- Torx or star: Match the T number exactly. GRK’s range spans T10 through T40, so “star drive” alone is not a usable size specification (GRK Fasteners).
- Square recess: Match SQ1, SQ2, SQ3 or the manufacturer’s stated size.
- External hex head: Measure across opposite flats or use the fastener specification. 1/4 inch and 5/16 inch are separate sizes even when combined in one reversible nut setter (Milwaukee Tool).
- Security drive: A pin-in Torx or another tamper-resistant recess requires the corresponding security bit, not the ordinary version.
With the tool disconnected, test the bit in the screw. It should enter fully and have little rotational play. An undersized tip concentrates load near the recess edges; an oversized tip will not seat fully.
Power Bits Fit Directly; Insert Bits Need a Holder
A power bit combines the driver tip and a direct-fit hex shank. It avoids the extra connection of a holder and is the straightforward choice for repetitive work.
An insert bit is short and replaceable. Pair it with an impact-rated holder whose shank fits the driver. Makita specifies a 1/4-inch hex shank and C-ring bit retention on one impact holder; it also uses a torsion section intended to reduce stress at the bit tip (Makita). A magnetic holder can help position a fastener that is attracted to a magnet, but it cannot correct a mismatched tip.
Use the shortest arrangement that reaches the screw squarely. Extra length improves access but can make wobble more noticeable, especially when a holder adds another connection.
Impact-Rated Bits Are Built for Repeated Loading
An impact driver applies repeated rotational impacts as resistance rises. Impact-rated bits are engineered for that loading rather than merely shaped to fit the collet. Manufacturers use features such as controlled heat treatment and torsion sections; DeWalt describes dual torsion zones and optimized tip geometry intended to reduce wear, stripping and cam-out (DeWalt).
No bit is unbreakable. Milwaukee’s 2953-20 manual warns that accessories not designed for impact wrenches and drivers may break or shatter (Milwaukee operator’s manual). Replace a bit with rounded lobes, chipped corners, cracks, twisting or a damaged retention groove.
Install the Bit and Drive Without Stripping the Screw
- Disconnect the tool from power; remove the battery from a cordless model before changing the accessory.
- Insert the power bit or holder fully and confirm that the collet retains it. Follow the tool manual; Milwaukee’s 2953-20 accepts the shank by pressing it into the hex chuck and releases it by pulling the ring (operator’s manual).
- Seat the tip fully in the screw before pulling the trigger.
- Keep the tool aligned with the screw and apply enough forward pressure to maintain engagement.
- Start slowly and increase speed only while the bit remains seated.
- Release the trigger at the required depth. Do not continue impacting a seated screw.
The bit is only one part of the match. An undersized pilot hole, unsuitable screw, hard substrate or excessive seating depth can overload a correctly fitted bit. Obtain the pilot-hole diameter from the fastener manufacturer’s data for that screw and substrate; use the drill-bit size chart only to translate a specified diameter into an available drill size.
Do not use an impact driver on soft decorative fasteners such as brass screws. Prepare the specified pilot and clearance holes, then use a drill/driver with controlled speed or a hand screwdriver.
Diagnose the Failure Before Changing Bits
| Symptom | Likely mismatch | Correction |
|---|---|---|
| Bit climbs out | Wrong profile or size, worn tip, poor alignment or inadequate pressure | Verify the recess and size; replace the bit; align the tool |
| Correct bit repeatedly snaps | Non-impact accessory, excessive impacting, binding screw or inadequate pilot hole | Use an impact-rated bit and reduce installation resistance |
| Screw recess strips | Mismatched tip, damaged screw or driving after seating | Replace the screw and verify the specified drive size |
| Hex head rounds | Wrong nut-setter size or shallow engagement | Use the exact across-flats size and seat it fully |
| Long assembly wobbles | Excessive length, bent bit or loose holder connection | Use a shorter, straight power bit where access permits |
If the connection has a specified installation torque, elapsed impact time is not a torque measurement. Follow the fastener instructions and use the specified calibrated torque tool or approved installation method. For substantial socket work, check whether the job requires an impact wrench rather than an impact driver.